STORYBOARDING FOR AI VIDEO


Unlike traditional film and TV storyboards, which are typically hand-sketched illustrations used for planning shots, Al video storyboards are created using Al-generated images. These images don't just represent the vision-they can often become the actual visual assets used in the final production, especially when using image-to-video workflows.


Creating a storyboard this way provides an immediate visual blueprint of your video, making it easy to identify missing scenes, inconsistencies, and additional assets needed before production begins. It's one of the most effective ways to refine ideas, validate creative direction, and ensure every shot is accounted for before generating the final Al video.


SEE THE LECTURES ON STORYBOARDS STARTING HERE

Step 1: Generate Your Images

Create Al-generated images that represent the key scenes, moments, and shots you want to include in your video.

Step 2: Display these in a Storyboard

Arrange your images in sequence to visualize the flow, pacing, and narrative structure of the video.

Step 3: Add in or Note Additional Shots Needed

Review the storyboard to identify missing transitions, supporting visuals, or scenes required to complete the story.

AI IMAGE GENERATION TOOLS

QUICKLINKS: Core Tools

EXAMPLE: The Scene

Opening Scene – Futuristic Rebel Searching for Survivors

A lone female rebel stands outside the entrance of a massive abandoned megastructure in a dystopian future. She wears worn tactical clothing layered with futuristic armor plates, illuminated by faint blue LED accents. Rain falls through the glow of distant neon signs while fog drifts across the cracked pavement. Her face shows fear and determination as she scans the dark entrance ahead.


The building's towering doorway is partially open, revealing only darkness beyond. Flickering emergency lights cast long shadows across the corridor inside. She grips a compact futuristic weapon close to her chest and cautiously steps forward, listening for movement. The atmosphere is tense and unsettling, with signs of a recent disaster scattered around the entrance.


Mood: Suspenseful, eerie, survival horror, cinematic.
Camera: Medium-wide shot from behind and slightly to the side, slowly tracking with her as she enters the building.
Lighting: Neon reflections, cold blue tones, flickering red emergency lights, deep shadows.
Emotion: Anxious, cautious, searching for survivors while fearing what might be waiting inside.

EXAMPLE: The Shots

Opening Sequence: The Search for Survivors

Scene 1 – Approaching the Building

A futuristic female rebel walks alone through rain-soaked streets toward a massive abandoned building. Neon lights reflect on the wet pavement as fog drifts across the ground. She moves cautiously, scanning the area for danger.

Camera: Wide cinematic tracking shot from behind.
Emotion: Uneasy and alert.


Scene 2 – First Look at the Entrance

She stops several meters from the building and stares up at the enormous entrance. The doorway is partially open, revealing only darkness inside. Flickering lights pulse from within.

Camera: Low-angle shot emphasizing the scale of the structure.
Emotion: Intimidated but determined.


Scene 3 – Checking for Signs of Life

Close-up of her face as she listens carefully. Her eyes scan the shadows and her breathing becomes slightly heavier. A distant metallic sound echoes from inside the building.

Camera: Tight close-up on face.
Emotion: Worried and tense.


Scene 4 – Gripping Her Weapon

She tightens her grip on a futuristic weapon and takes a deep breath. Rain drips from her clothing as she prepares to enter.

Camera: Close-up of hands and weapon, then rack focus to her face.
Emotion: Preparing herself mentally.


Scene 5 – Crossing the Threshold

She slowly steps through the doorway into the darkness. Exterior neon light fades behind her while the interior swallows her in shadow.

Camera: Side profile tracking shot.
Emotion: Fear mixed with determination.


Scene 6 – The Dark Corridor

Inside the building, a long corridor stretches ahead. Emergency lights flicker intermittently, revealing damaged walls and abandoned belongings.

Camera: Over-the-shoulder shot looking down the corridor.
Emotion: Suspense and uncertainty.


Scene 7 – Discovering Evidence of Survivors

She notices fresh footprints in dust and a recently used flashlight lying on the floor. Someone has been here recently.

Camera: Close-up on footprints and flashlight.
Emotion: Hope mixed with caution.


Scene 8 – Hearing a Noise

A loud metallic crash echoes from a distant room. She immediately turns toward the sound and raises her weapon.

Camera: Fast push-in toward her reaction.
Emotion: Shock and fear.


Scene 9 – Moving Toward the Sound

She slowly advances down the corridor, passing flickering lights and dark doorways. Every shadow feels threatening.

Camera: Slow tracking shot in front of her as she walks.
Emotion: Growing tension.


Scene 10 – End of Opening Sequence

She reaches a doorway where a faint light spills out from inside. She pauses, listening. The camera slowly pushes toward the door as the scene ends.

Camera: Slow cinematic push-in.
Emotion: Suspenseful cliffhanger before the next sequence.

EXAMPLE: The Prompts

Opening Sequence: The Search for Survivors

Scene 1 – Approaching the Building

Using the uploaded character reference, create a cinematic wide shot of the character walking alone through a rain-soaked futuristic city street at night. Massive abandoned skyscrapers tower overhead. Neon signs flicker through thick fog. Wet pavement reflects blue and purple neon light. The character is moving cautiously toward a huge abandoned building in the distance. Dystopian atmosphere, cinematic lighting, volumetric fog, ultra-detailed, realistic science fiction, dramatic composition, movie still, 16:9.


Scene 2 – First Look at the Entrance

Using the uploaded character reference, create a cinematic low-angle shot of the character standing in front of a massive abandoned futuristic building entrance. The giant doorway is partially open, revealing darkness inside. Flickering red emergency lights glow from within. The scale of the structure makes the character appear small. Dark sci-fi atmosphere, realistic lighting, rain, cinematic shadows, detailed architecture, suspenseful movie scene, 16:9.


Scene 3 – Checking for Signs of Life

Using the uploaded character reference, create a close-up portrait of the character standing outside the entrance, listening carefully for sounds. Her expression shows fear, anxiety, and determination. Rain droplets on her face and clothing. Neon lights reflect in her eyes. Background softly blurred with hints of the dark entrance behind her. Hyper-realistic cinematic portrait, dramatic lighting, emotional storytelling, shallow depth of field, movie still, 16:9.


Scene 4 – Gripping Her Weapon

Using the uploaded character reference Woman wearing futuristic clothing , create a cinematic medium close-up of the character gripping a futuristic weapon tightly which looks like a metallic small ball with one hand held up. Rain drips from her clothing. Her knuckles are tense. The weapon is illuminated by nearby neon reflections. She looks focused and prepared for danger. High detail, realistic sci-fi technology, dramatic lighting, cinematic tension, movie-quality frame, 16:9.


Scene 5 – Crossing the Threshold

Using the uploaded character reference, create a cinematic side-profile shot of the character stepping through the doorway into a dark abandoned building. Bright neon city lights remain behind her while darkness stretches ahead. The contrast between exterior and interior light creates a dramatic silhouette. Suspenseful atmosphere, volumetric lighting, realistic shadows, dystopian science fiction, movie still, 16:9.


Scene 6 – The Dark Corridor

Using the uploaded character reference, create an over-the-shoulder view from behind the character inside a long abandoned corridor. Flickering emergency lights reveal damaged walls, debris, broken equipment, and signs of previous occupants. The corridor disappears into darkness. Atmospheric sci-fi horror, cinematic lighting, suspenseful mood, realistic textures, detailed environment, movie still, 16:9.


Scene 7 – Discovering Evidence of Survivors

Using the uploaded character reference, create a cinematic scene where the character kneels beside fresh footprints in dusty flooring. A recently used flashlight lies nearby. The character studies the clues carefully. Light from flickering emergency lamps creates dramatic shadows. Post-apocalyptic science fiction setting, realistic details, mystery and suspense, highly cinematic, 16:9.


Scene 8 – Hearing a Noise

Using the uploaded character reference, create a dramatic reaction shot inside the abandoned building. The character suddenly turns toward an unseen sound, eyes wide with alarm. She raises her metalic ball defensively. Motion frozen at the moment of surprise. Flickering red and blue emergency lights illuminate the scene. High tension, cinematic suspense, realistic sci-fi thriller, movie still, 16:9.


Scene 9 – Moving Toward the Sound

Using the uploaded character reference, create a cinematic front-facing tracking-style shot of the character carefully walking down a dark corridor. Open doorways line the walls. Deep shadows conceal unknown dangers. The character moves slowly with weapon ready. Atmospheric fog, flickering lights, suspenseful science fiction environment, dramatic composition, realistic movie frame, 16:9.


Scene 10 – The Mysterious Door

Using the uploaded character reference, create a cinematic shot of the character standing before a partially open doorway emitting a faint warm light. She pauses and listens before entering. The surrounding corridor remains dark and threatening. Strong contrast between light and shadow. Suspenseful cliffhanger ending, realistic sci-fi environment, dramatic movie lighting, ultra-detailed, 16:9.

Storyboard

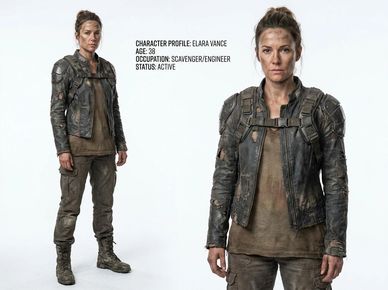
Character

The chacater I have already created for my scene. 

1

Action: character walks forwards slowly. 

Sounds of flickering neon signs, eerie. 

Camera is static. 

2

2

Action: character slowly walks forwards towards the doorway. 

Sounds turns silent, just hear her breathing, anxious. 

Camera is static. 

3

3

2

Action: character slooks at the doorway and around checking for anyone. She reaches to her pocket for a weapon

Sounds turns silent, just hear her breathing, anxious. 

Camera is static. 

4

3

4

Action: character lifts her weapon, gets more confident and exits shot walking forwards. 

Sounds music starts. 

Camera is static. 

5

3

4

Action: character slowly walks forwards 

Sounds music continues. 

Camera moves forwards, fade to black.

6

6

6
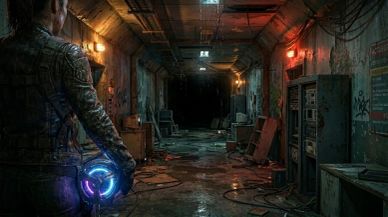
Action: character slowly walks forwards slowly down the corridor. 

Sounds of footsteps echo, music. 

Camera fades in from black and slowly follows her as she walks. 

7

6

6

Action: character notices the footprint and kneels down. 

Sounds of her breathing and music 

Camera slowly moves around towards the footprint. 

8

6

8

Determined woman holding a grenade in a tense moment.

Action: shocked jumps to her feet as she hears sound

Sounds of her breathing and music intensifies 

Camera static, she enters frame as she stands. She looks around and then slowly walks towards the sound. 

9

End

8

Action: character walks down the corridor checking nerviously. 

Sounds of her breathing, footsteps and music 

Camera slowly moves backwards as she walks

10

End

End

Action: character moves forwards to an open doorway. 

Sounds of her breathing and music cuts to silence - suspense

Camera is static

End

End

End

Action: character slowly opens creaky door. 

Sounds of her breathing, suspense 

Camera is static

What's Missing/Changes Needed

Used text to image with only character reference image. 


Note: For better consistency also generate scene images (outside and inside building) and a reference image for the ball-weapon and flashlight. 


1. Close up of characters face as she walks forwards between shots 1 and 2


2. Show her getting the weapon close up of pocket between shots 3 and 4


2. Close up feet of her walking forwards and crossing in to building between 4 and 5


3. Fade to black in edit to show time pass and footsteps. 


4. shots of her looking around, close up of face and she notices foot print on the floor between 5 and 6


5. consistency of weapon (ball) create reference image for this 


Sounds for the edit, footsteps, sirens, creaking doors, suspense music mixed with breaks in eerie silence

What to do next?

Either generate the images (if you want to use these for images > video) and create element images for your scene. 


Or detail out everything ready for your production process if you are using text to video, elements, iamge to video or a mix of all methods. 

SECTION TASK

Start by using the shot list created in the previous section, it’s time to bring it into production by creating your storyboard. This is where your ideas begin to take visual shape, turning your shot list into concrete frames that define how your video will look and flow.


Step 1: Image Prompts from Your Shot List

Start by using the shot list created  in your moodboard stage:

  • Ask your chosen LLM model to create image prompts for your shots
  • Ensure it's creating the starting frame (to turn this from image to video) 
  • Check to see if any obvious shots are missing (we will add additional shots later)


Step 2: Turn Shots into Storyboard Frames

Use AI image generation tools to create a visual frame for each shot.

For each frame, define:

  • Subject and action
  • Camera angle and composition
  • Environment and lighting
  • Mood and emotional tone


Step 3: Maintain Visual Consistency

Use your Style Guide to ensure all storyboard frames match your intended look.

Check for:

  • Consistent character appearance
  • Matching environments and lighting style
  • Cohesive color palette and mood
  • Continuity between shots


Step 4: Review and Refine Your Storyboard

Once all frames are generated, review the full sequence as a whole.

Ask AI to help you:

  • Identify missing shots or transitions
  • Improve pacing or flow
  • Suggest additional visual moments
  • Strengthen storytelling clarity


Step 5: Finalize Your Storyboard

Organize your images into a complete visual sequence that represents your video from start to finish.

Include:

  • All storyboard frames in order
  • Shot descriptions or notes
  • Camera direction (if needed)
  • Key emotional beats


Deliverable

By the end of this task, you should have:
✅ A complete AI-generated storyboard
✅ All key shots visualized as images
✅ Consistent characters and environments
✅ A clear visual flow of your entire video
✅ A production-ready reference for AI video generation


This storyboard becomes the direct blueprint for turning your images into final AI video scenes.

Back to All Course Pages
All Course pages

Go back to the course here:

AI Video School

Copyright © 2026 AI Video School - All Rights Reserved.

This website uses cookies.

We use cookies to analyze website traffic and improve the performance of our website. By accepting our use of cookies, we will aggregate your data with all other user data.

RejectAccept